Saturday, 22 June 2013

Scofflaw Nail Varnish- Koi Pondering Review

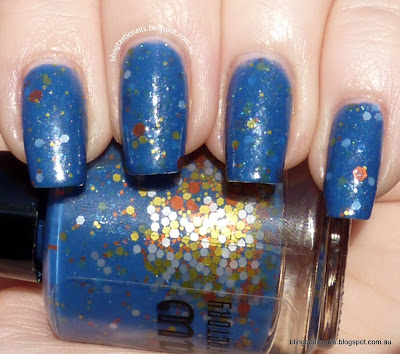
Hello there! Today I have a review for you of a polish sent to me in a press kit from Femme Fatale Cosmetics. Femme Fatale Cosmetics sell amazing cosmetics and nail polishes of their own branding, but also stock international brands of polish for Aussie chicks to be able to purchase. Today I have for you international polish Scofflaw Nail Varnish Koi Pondering which is a medium blue based shimmering nail polish with matte glitters in various sizes of white, orange, and yellow.

Scofflaw Nail Varnish Koi Pondering
Three coats of Scofflaw Nail Varnish Koi Pondering full sun.

Scofflaw Nail Varnish Koi Pondering

Scofflaw Nail Varnish Koi Pondering in shade.

Scofflaw Nail Varnish Koi Pondering
 The three coats with top coat for a blue squishy look with floating glitters

Scofflaw Nail Varnish Koi Pondering
 Full sun highlights the micro glitter shimmer

Scofflaw Nail Varnish Koi Pondering
 All the gorgeous glitters!

I applied 3 coats of Koi Pondering and the formula was great, no glitter fishing. What surprised me was how quickly the polish dried. Sometimes glitter bomb polishes don't dry very well without a top coat but this one was good to go in 5 minutes or so, without a top coat. I hung out the washing without ruining my polish 10 minutes after application so I was very impressed! A top coat did bring out the micro glitters and smoothed the larger glitters so I would recommend one, but I only needed one coat for a smooth to touch finish.

Scofflaw Nail Varnish can be purchased from Femme Fatale Cosmetics for $12 each, Koi Pondering is out of stock currently but you can be put on the waitlist to be notified when it is back in stock.

Hope your weekend is going well, mine is filled with washing and glitter polish. Did you like Koi Pondering? I personally love it and it's still on my nails now :)

Wednesday, 19 June 2013

KKCenterhk Review- Silver Little Circle Hidden Nail Foils

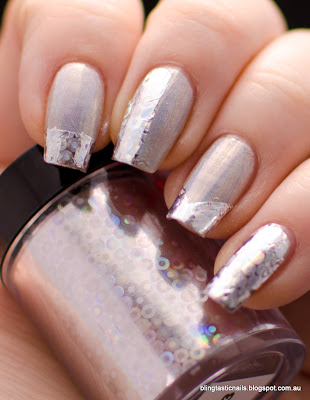
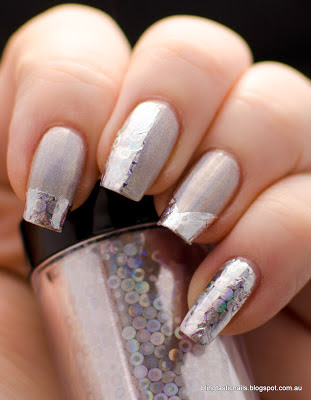
Hello all! Today I have for you another review for a product sent to my by KKcenterhk which has a whole world of nail art and beauty products. I was particularly excited to receive a holographic silver nail foil to try. My product was Silver Little Circle Hidden Nail Foil Transfer with glue, which can be found here. Below is the look I created :)

KKcenterhk Holographic Nail Foils
Silver Little Circle Hidden Nail Foil manicure :)

So, what came in my package was the nail foil in a cute plastic container and glue:
KKcenterhk Holographic Nail Foils

A pretty large roll of foil, with awesome holographic circle.
KKcenterhk Holographic Nail Foils


KKcenterhk Holographic Nail Foils
 I painted my nails with a silver holo polish, then applied the glue until it disappeared

KKcenterhk Holographic Nail Foils
  I then placed the foil on my finger and pressed down gently.
KKcenterhk Holographic Nail FoilsKKcenterhk Holographic Nail Foils


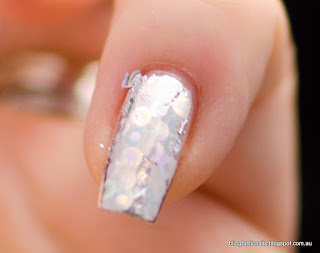
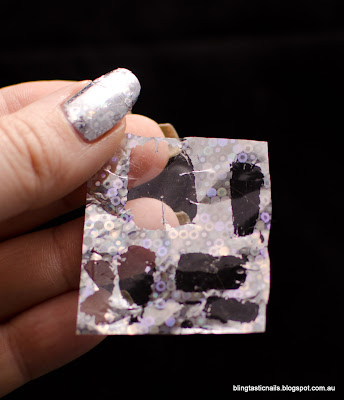
When I lifted the foil gently, the foil stayed on the nail clear plastic remained.

KKcenterhk Holographic Nail FoilsKKcenterhk Holographic Nail Foils
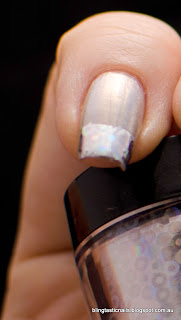
I did the same thing with my thumb, put glue only on the tip of my first finger

KKcenterhk Holographic Nail FoilsKKcenterhk Holographic Nail Foils
 Glued half my middle finger and a chevron on my ring finger

KKcenterhk Holographic Nail Foils
This was enough foil paper to do all my fingers!

KKcenterhk Holographic Nail Foils

This was the final result

KKcenterhk Holographic Nail Foils

This was my first attempt at using nail foils and I was pretty happy with how it came out. My application was not wrinkle free, but it really wasn't that noticeable. The pattern was lovely and holographic and I found that the glue dried quickly and it held the foil down well. I didn't add a top coat as I have heard this adds more wrinkles. I will be definitely having another at nail foils as I really liked the effect of the foil and I want to get my technique down so they are smooth and blingy!

My product was Silver Little Circle Hidden Nail Foil Transfer and comes with a total of 150cm of nail foil for $7.96 without the glue, or $12 with the glue. The glue isn't strictly necessary but it's handy as you can paint it on easily and there is a 10% discount for my blog readers if you want to buy some nail foils or other products from KKcenterhk. Just use the unique coupon code of "blingnails" and the coupon is valid until Jan 31st 2014.

*note this product was sent to me by review but has not influenced my opinion of the product.

Sunday, 16 June 2013

China Glaze Sun of a Peach and Zoya Beatrix

Hi guys! Is winter over yet?? Some people don't do winter well, I am one of them. I find the dark depressive and and I am just lethargic and bleh. I just want to sleep! So, when my nail supply store had the China Glaze Sunsational polishes in stock I was sooo happy to have some semblance of summer, even if its fake! They also had the Zoya Summer Pixie Dusts in store, woot! Since I am drawn to peach..Sun of a Peach was my first choice. It's SOOOOOO neon, I am in love! Zoya Beatrix goes well for an orange contrast, a match made in faux summer heaven. I also popped a layer of Hare Electric Flame on my thumb, and that looked awesome as well! Onto the pics :)

China Glaze Sun of a Peach with Zoya Beatrix nail art
China Glaze Sun Of A Peach, 2 coats, with Zoya Destiny free handed on first and little finger, attempted stamping on ring and striping tape design on middle finger!

China Glaze Sun of a Peach, Zoya Beatrix and Hare Electric Flame
Sunshine in bottles! L-R, China Glaze Sun of a Peach, Zoya Beatrix, Hare Electric Flame

Hare Electric Flame
Hare Electric Flame over CG Sun of a Peach on my thumb

China Glaze Sun of a Peach with Zoya Beatrix nail art
Zoya Beatrix with no top coat, faint stamping seen on ring finger

China Glaze Sun of a Peach with Zoya Beatrix nail art
Zoya Beatrix, so glittery! 

Iphone pic to show you the neon of Sun of a Peach that I woke up to..so glowy!

So, China Glaze Sun of a Peach wasn't the easiest to apply, none of the creme neons from the Sunsational collection are, but you know what I don't care! This color has zoomed up to my top 5 of polishes as it's peach, it's neon and its fabulous. I love this color. Zoya Beatrix was so glittery and easy to love as well and it looked really lovely with Sun of a Peach. I thought I would try stamping with Beatrix and it did work but the contrast wasn't great enough to be highly visible. I got a few strange looks with my Summer fabulous nails since it's Winter here, but you know what, the polish made me happy..so it didn't matter to me. 

What do you think about this look? Summer only? Let me know :)

Wednesday, 12 June 2013

Guest Post on Nailtopia- Dance Legend Termo Trio 3

Hi guys! Tonight I want to point you towards my guest post on Nailtopia :) I am really loving guest posts because it makes me think more about creating something fun and a bit different. Thanks to the creative minds that hang out in Aussie Nails on Facebook, the hole punch polish decals have come into existence and I have hurled myself upon the bandwagon using Dance Legend Termo Trio 3 to create a color change decal. If you want to see how to make your own, check out the Oh My Gosh Polish's Youtube Tutorial. Please go check out my post on Nailtopia here and make sure you check out her blog for other awesome manicures and nail art :)

Dance Legend Termo Trio3 with nail polish cat decal

Tuesday, 11 June 2013

OMG Nail Polish Strips Review- Camoflage

Good Evening :) I have been meaning to do my OMG Nail Polish Strips review for a while, as OMG were kind enough to send me 2 different nail polish strips to review and do nail art with. Today I have the Camouflage Nail Polish Strips to review and show you. Now I have never used nail polish strips..ever..why you ask? I don't know! These were really easy to apply and looked great on my nails. This is going to be a bit about application, a bit of a review and a bit about nail art, or I like to think of it as "how apply your nail polish strips and then use the rest to look amazing on your nails". Like this!


OMG Nail Polish Strips Camouflage manicure

Onto the product:
OMG Nail Polish Strips Camouflage
Camouflage Nail Polish Strips (Green/Brown)
As you can see there is 7  different widths of polish strips which you can measure against your nails and pick the right width. The pack comes with 2 sets of 7 polish strips, 5 for use on your fingers and 4 in case you have an application error (which is hard to to do!) or want to create some fun nail art with the extra strips.

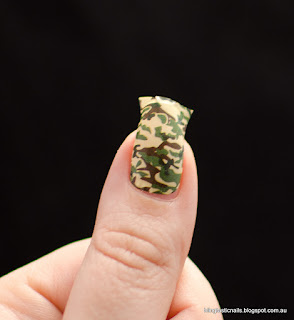
I chose to do 2 full nails with the polish strips, my thumb used the 14.5mm strip and my ring finger using the 11.5mm strip. I cut these out of the line they came in and as per the application instructions I didn't use a base coat on my nails. I removed the top layer of clear film, then peeled the sticker/polish strip off the non stick backing and lined up the rounded end of the sticker to the base of my nail near the cuticle and pressed down. I cut the polish strip close to the edge of my nail and kept the remainder of the polish strip to use later.
OMG Nail Polish Strips Camouflage

I then filed down the rest of the nail polish strip at the edge of my nail with a nail file, in a downward motion for the end result of this, nice and neat:

OMG Nail Polish Strips Camouflage
Now you can add a layer or two of top coat to protect the strip like you would a usual manicure :)

OMG Nail Polish Strips Camouflage manicure
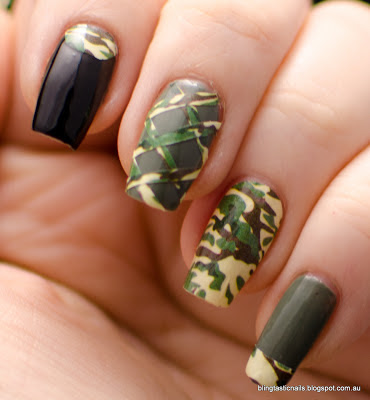
I applied the other polish strip using the same method to my ring finger..keeping the polish cut off remainder for this as well.I then painted my first finger with black polish, and my middle and little finger in a camouflage green polish. With the remainder of the polish strip I used on my ring finger I cut out a half moon and applied it to the top of my nail near the cuticle, as below.

OMG Nail Polish Strips Camouflage manicure

AND I also added a strip from the remainder I had to my little finger, for a cammo french tip as below

OMG Nail Polish Strips Camouflage manicure

With the polish strip left over from my thumb, I cut into 6 strips and placed it over polish on my middle finger in a criss-cross pattern

OMG Nail Polish Strips Camouflage manicure

To create the over all look of this!

OMG Nail Polish Strips Camouflage manicure


With Flash

With Flash :)

 I was super happy with the end result and I only used 2 nail polish strips to do this manicure of 5 fingers! I liked that the instructions were clear and the polish strips seemed to suit my curved nails and fit well. The polish strips were quite easy to apply, and have a nice glossy finish. My nails are medium length and I had good coverage with enough left over to create some fun nail art. I can't comment on length of wear as I only applied them today!
OMG Nail Polish Strips can be bought here at Nail Polish Strips and the ones sent to me were the Camouflage Nail Polish Strips which are $6.89. There are some more fun designs from the last time I looked and the good thing is that shipping is free worldwide, and at the moment you can pick 4 packs of Nail Polish Strips for $20.

*OMG Nail Polish Strips were provided to me for review but this in no way affects my review or opinion about the product.

Monday, 10 June 2013

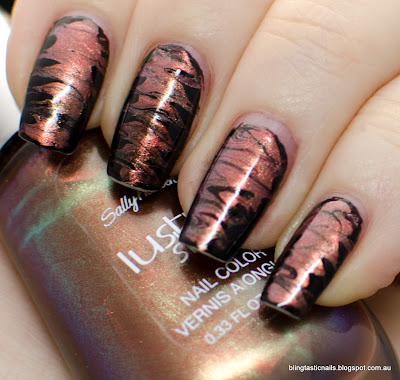
Sally Hansen Copperhead Drag Marble

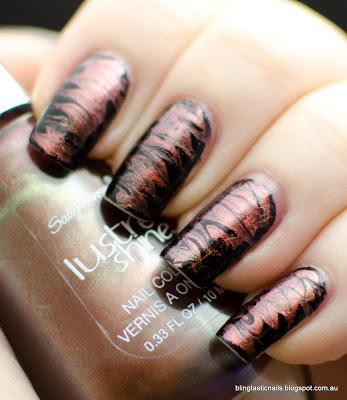
Hello everybodies! I have a quick post for you tonight inspired by Lab Muffin's Tortoiseshell Drag Marble and originally I was going to use different colors, but I thought..why not recreate the look with close as I can get colors! So for this recreation I used Sally Hansen's Lustre Shine Copperhead and A-England Lancelot. For the tutorial on how to do the drag marble look you can head over and check out Lab Muffins tutorial here
Sally Hansen Lustre Shine Copperhead

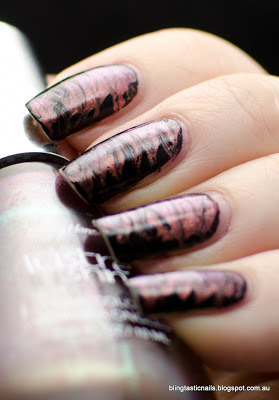
Drag Marble manicure with Sally Hansen Lustre Shine Copperhead and A-England Lancelot
Sally Hansen Copper head with A-England Lancelot

Drag Marble manicure with Sally Hansen Lustre Shine Copperhead and A-England Lancelot
With flash

Drag Marble manicure with Sally Hansen Lustre Shine Copperhead and A-England Lancelot


Drag Marble manicure with Sally Hansen Lustre Shine Copperhead and A-England Lancelot

I really like the look of the drag marble effect, you have to work quickly and be careful not to drag too hard or you end up with bare nail patches. I found the cleanup for Lancelot difficult on my ring finger..hence a bit more of a gap but otherwise the rest weren't too bad! Sally Hansen Copperhead was much more different on the nail than in the box, it was more copper/bronze which I loved. The duochrome can be seen as a duskiness and was more evident in person.
This was a super fun and quick look to do and looks amazingly difficult to do, but all you need is 2 polishes and a toothpick..will you be trying it?

Wednesday, 5 June 2013

piCture pOlish O'Hara Stamped- AN Monday

Hi everyone! I am a little bit late for this post..but I did do this look on Monday for Aussie Nails Monday. This weeks AN Monday the theme was "Hearts" and since I had just received my piCture pOlish order I was pretty keen to try out one of my new pretties.  Calling out to me was the awesome o'hara, o'hara is the hottest gorgeous red polish with sparkles of holographic goodness that I just love! 


piCture pOlish o'hara
piCture pOlish o'hara, 2 coats with 1 coat of Seche Vite.

piCture pOlish o'hara
So pretty!

I then stamped with China Glaze Pink-ie Promise, Something Sweet and Color Club Miss Bliss in a graduation of pinks over the nail :)

piCture pOlish o'hara with pink hearts stamping
Picture taken in lightbox

piCture pOlish o'hara with pink hearts stamping

Dodgy pic with flash for holo goodness :)

piCture pOlish o'hara with pink hearts stamping
 Who doesn't like hearts and crosses? The pirate way to wear hearts, LOL.

This was a simple but elegant way to wear hearts without being too girly :) piCture pOlish  o'hara had a great formula and was just so gorgeous! I had been waiting for all the various shades of piCture pOlish that I wanted came into stock and ordered their fabulous everyday deal which meant 2 free polishes. Who doesn't love something for free? I purchased my piCture pOlish directly from their web site here for the Aussie girls but international chicks can hit up Llarowe

Sunday, 2 June 2013

Nail Pattern Boldness Hello, Sweetie

Here is a quick post of something I did the other day. I have been re organizing and catching up on swatch sticks of some of my polishes *cough erm, lots of them cough* and sat at my desk and just had a blank about what I wanted to do. I knew I wanted to use something I hadn't tried before and I wanted to stamp, so this is how this mani came about. Yes, it's purple..again..but I love purple!

Nail Pattern Boldness Hello Sweetie with purple stamping
For this I used Picture Polish Wisteria as a base, Tips and Toes 20 (medium purple) for the accent and stamping with Pueen plate 49. Nail Pattern Boldness Hello, Sweetie on thumb and ring finger.

Nail Pattern Boldness Hello, Sweetie

Nail Pattern Boldness Hello Sweetie with purple stamping
 Gorgeous copper, black and red glitters in a purple base :)

Nail Pattern Boldness Hello Sweetie with purple stamping
All the stamping designs are from Pueen Plate 49. 

Nail Pattern Boldness Hello Sweetie with purple stamping

I love this glitter polish, it is loaded and easy to apply, no fish required, it's interesting and has colors that you wouldn't think go together, but they do and that's what draws you to it :) Picture Polish Wisteria is always awesome and I have just purchased a few more of these lovely polishes and I can't wait to try them. The Pueen plates stamp really well and I was very happy with the designs. I bought my Pueen plates from Amazon but they don't ship internationally. I do believe Harlow and Co stock them although they are sold out currently. Drama Queen Nails also  have the Pueen "Love Elements" plates found here
Tomorrow's post will not involve purple nails polish..promise! Hope you are having a great weekend

xox

Jas