Showing posts with label White. Show all posts

Sunday, 19 January 2014

Vincent turns One! Zebra Manicure :)

Vincent is my gorgeous little nephew from my only sister, and today was his One Year Old birthday party! He's a happy little man who is growing up fast and is a delightful baby who is pretty placid and happy most of the time. Apparently he takes after me in that regard, lol. Today my sister hosted his First birthday party with an animal theme, and I dressed up as a Zebra and my husband was an animal watcher on Safari.

My husband and Vincent with his puppy costume!

 So, of course I had to do the nails to go with the theme and I kinda went over the top with my Zebra manicure. For the manicure I used China Glaze Dandy Lyin Around, a coat of SnowGlobe and them stamped with Lilypad Laquer Rainbows in Space. I also did an accent nail with Lilypad Lacquer Rainbows in Space with a coat of Sparkles by Julie Sugah!

China Glaze Dandy Lyin' Around, China Glaze Snowglobe and Lilypad Lacquer Rainbows in Space
Not sure this could be ANY blingier! LOL

China Glaze Dandy Lyin' Around, China Glaze Snowglobe and Lilypad Lacquer Rainbows in Space
I stamped the Zebra stripes with Bundle Monster plates :)

China Glaze Dandy Lyin' Around, China Glaze Snowglobe and Lilypad Lacquer Rainbows in Space
Insane Rainbows on the Ring Finger!

Now I also did matching toenails..so warnings, a foot photo ahead!

China Glaze Dandy Lyin' Around, China Glaze Snowglobe and Lilypad Lacquer Rainbows in Space

Now, I know the black stamping wasn't very black and there was alot going on here. If I was doing this to look like real Zebra stripes, I would have just done a white base with Dandy Lyin Around, and stamped with a strong black. But I wanted the glittah and wanted the holo. I was greedy. I asked my husband if it was a bit over the top..he didn't think so! LOL. Anyways. I am going to keep the toes for a week or so, as bling toes always work. Unfortunately, I need work appropirate nails tomorrow, so this is coming off tonight :(

Monday, 20 May 2013

Aussie Nails Monday- Lace..and Leather and Curtains!?

Evening chicks, welcome to tonight's quickie..a quick blog post that is ;) I spent the weekend doing a post for a bit later down the track that was super impossible to photograph color-true so I had 4 different attempts at various times of the day with 2 different cameras..it did my head in! I had time to do something for today's Aussie Nails Monday where the theme was Lace. I wanted to make this look tough and to stamp with my new Pueen plates I received in a group buy organised by one of the awesome Aussie Nails chicks.. thanks Nicole! Anyways, my take on this was Leather and Lace, which then turned into Leather and Lace Curtains..take a look!

Nails Inc Leather Noho with black and white lace stamping
 L-R, Nails Inc Leather Noho, CG Liquid Leather stamped with Ulta3 Lily White, same for ring finger except reversed and Nails Inc Leather Noho again.

Nails Inc Leather Noho with black and white lace stamping
I framed the middle and ring finger with "curtains"

This was a fun look and it sort of evolved as I did it. I was keen on the leather and lace, but my friend Emma said the stamping looked like old fashioned curtains..and it does! So I added the "curtains" to frame the lace. This it worked best on the black with white stamp I feel and the other was a bit of a fail, but I gave it a go! I really loved Nails Inc Leather effect in Noho, it just so tough looking. I am keen to play around with it a bit more.
Well, this is the end of the quickie...hope your Monday was awesome!

Check out the other awesome Aussie Chicks


Members


Caylah -
 
Tash -
 
 
Tracy -
 

Wednesday, 11 July 2012

Kleancolor Salsa, Sally Hansen White Out and China Glaze Liquid Leather Watermarble

I stayed up wayyyyy to late last night and as a result of wandering around the internets and Youtube whilst watching North and South (Elizabeth Gaskell's book in TV mini series), I woke up this morning with an attitude of "I want to try water marbling, it looks great, lets give it a go". So, I sat there thinking about a color scheme that is work appropriate...looked at my bottle of Nostalgic As If! and decided I wanted to try a white, pink and black water marble :) I guess my hands will be in my pockets alot tomorrow!

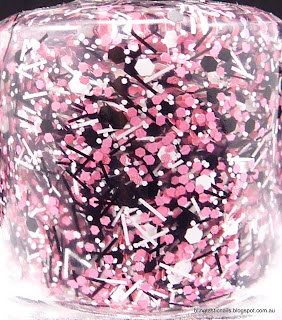
Here is my bottle of inspiration:
Nostalgic Lacquer As If!Nostalgic Lacquer As If!
Nostalgic As If! and macro of As If!

Sally Hansen White on, Kleancolor Salsa and China Glaze Liquid Leather

Here is the colors I chose to marble with were Sally Hansen White On, Kleancolor Salsa and China Glaze Liquid Leather.

 The way I water marbled was to use a very small glass ie. Sherry/port glass, similar to this size
It has a small water surface area, enough for 1 finger. I also used a toothpick, cotton bud and Micropore (Nursing tape) to create the effect. You can search you tube for great tutorial on the best was to water marble. I chose to tape around each nail to cover my finger and not get polish on my hands. This worked pretty well for minimizing mess and clean up. Not sure how regular tape would have done!

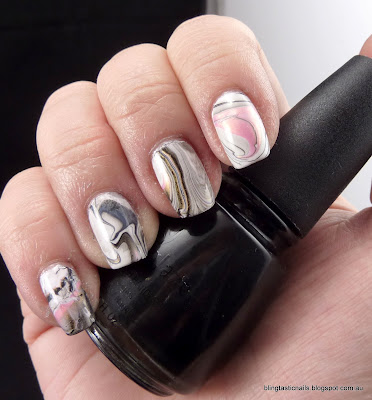
And here is the effect, the watermarble was done over Ulta3 base coat and 1 coat of Sally Hansen White on, topped with Seche Vite. Please ignore my dry cuticles!
Pink, white and black water marble effect mani
Left Hand Water Marble Effort

Pink, white and black water marble effect mani
Left Thumb

Pink, white and black water marble effect mani
 Right Hand

Pink, white and black water marble effect mani
Right Hand

Pink, white and black water marble effect mani
Right Thumb

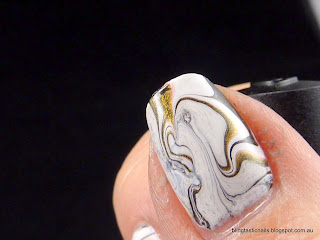
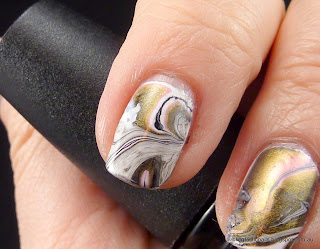
Here is a few Macro shots of the nails I particular like :)
Pink, white and black water marble effect maniPink, white and black water marble effect mani

Water marbling isn't that easy to get the design you want, it's messy but the clean up isn't too terrible for the end result. There are a few different methods, I was happy with the taping method and how the water marbling turned out :) Kleancolor Salsa turned out to be almost a 2 in 1 polish as the pink/gold shimmer seemed to separate in the water resulting in the bronze color you see in between the pink and black and I so glad that it happened, it made the mani really pop and blinged it up a bit! I did 2 nails over again as they had too much dark/black pigment with no swirly pattern.

Overall I was pretty chuffed with how my first attempt turned out. Hope you liked this mani and have had a go at water marbling, it's pretty fun!

Sunday, 1 July 2012

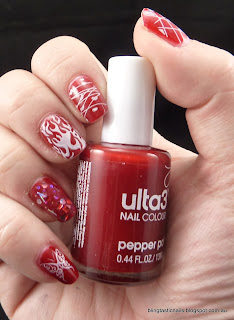
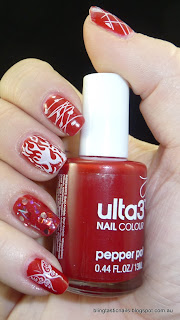
Ulta3 Pepper Pot with MASH stamping

Sorry for the super slackness of not posting yesterday, work so interferes with life sometimes! So to make it up, I will show you Ulta3 Pepper Pot with MASH stamping in this post and in the next, some awesome Nail Mail :)
Onto the Pepper Pot mani..I wanted to have a go at my new MASH plates that I received this week (along with my Bundle Monster and Red Angel plates). I ordered both the older and new MASH plates and thought Pepper pot would make a good back ground. The surprise of using Pepper Pot was that it was pretty thick and a jelly! I did thin it out a bit, but it was still very difficult to work with, bleh :( I am also not loving my cuticles or nails at the moment, I blame winter.

Ulta3 Pepper PotUlta3 Pepper Pot

 Ulta3 Pepper Pot with and without flash

Ulta3 Pepper Pot with MASH plate stamping
 Right Hand with stamping using MASH plates, loving the flames :)

Ulta3 Pepper Pot with MASH plate stampingUlta3 Pepper Pot with MASH plate stamping
 Right hand without and with flash

Ulta3 Pepper Pot with MASH plate stamping
 Right thumb with stamping, it looks cool doesn't it?

Ulta3 Pepper Pot with MASH plate stamping
Left Hand stamping on my Iphone

For this particular look I used Ulta3 Base Coat, 2 Coats of Ulta3 Pepper Pot and I stamped with Sally Hansen White out. I did an accent nail with Pahlish Total Eclipse of the Heart :) I found Pepper Pot so hard to apply, it bled into the cuticles even with careful application and the clean up was so hard due to the pigmentation (as you can see above!). I was super happy with MASH plate designs (the angel wings are a Red Angel plate- that is another story!) but I can't wait to try a better mani with the MASH plates, not just a random sample one, LOL.

This was just a quick fun mani, just to try the stamping plates, so I'll have something less random next time! Hope you are all having a great weekend, extended for me..the joys of shiftwork :)

Sunday, 3 June 2012

Pretty & Polished Jawbreaker with Stamping

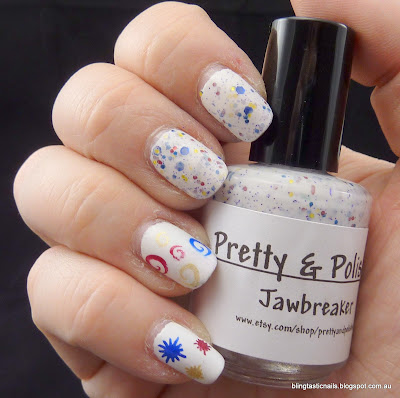
Today's challenge for me was that I wanted to use Pretty & Polished Jawbreaker as the basis for my mani but I didn't want it to be just about  Jawbreaker, although I do love, love, love it :) So this weeks look is a Jawbreaker mix up with stamping.


First of all, Pretty & Polished Jawbreaker!
Pretty and Polished JawbreakerPretty and Polished Jawbreaker
 Jawbreaker without Flash


Extreme close up of all the glittery goodness!
Pretty and Polished Jawbreaker

So here is what I used for the actual manicure.
Base: CND Stickey
Color: 2 coats of Ulta3 Lily White
Accent Color nails: Pretty & Polished Jawbreaker
Top Coat: Seche Vite
Stamping: Kleancolor Metallic Yellow, Red, Blue
Stamping Plates: Fun Plate 2, Bundle Monster and Cheeky Plates


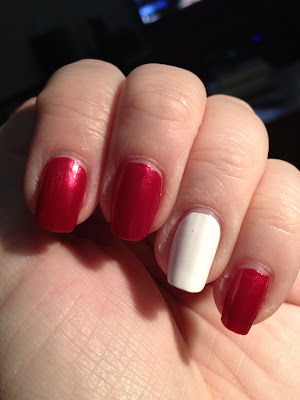
Ulta 3 Lily White Base
Ulta3 Lily WhiteUlta3 Lily White


Jawbreaker Accent- I did uncover the glitters in the polish with some acetone to make them more present.
Pretty and Polished JawbreakerPretty and Polished Jawbreaker


Pretty and Polished Jawbreaker

Now on to the stamping using Kleancolor L-R Metallic Yellow, Metallic Red and Metallic Sapphire
Dodgy Bottle Shot
Kleancolor Metallic Yellow, Metallic Red ad Metallic Sapphire
  

Stamping design, Left Hand
Please ignore cuticles, they had far too much acetone by the time I photographed.
Pretty and Polished Jawbreaker with metallic red, yellow and blue stamping


Pretty and Polished Jawbreaker with metallic red, yellow and blue stamping
Left Thumb

Pretty and Polished Jawbreaker with metallic red, yellow and blue stamping
 Right Hand Stamping

Pretty and Polished Jawbreaker with metallic red, yellow and blue stamping
Right Thumb

Now on the stamping front, can I just say it was NOT easy with the bright colors on white and the fact that the Kleancolor Metallics are tricky to get a good transfer and bleed like all get out :/ It took quite a few goes to even get this. Maybe my stamping mojo wasn't on for tonight. Anyways, I like the matching color combo and how it eventually turned out. 

Tips for stamping with the Kleancolor Metallics..scrape firmly, wait like 5-10 before picking up the design or it blobs. Then when the design is on the stamp wait another 5 seconds and transfer to the nail lightly. Don't press hard or it smudges.

Hope you liked todays offering, please leave your thoughts! :)

Thursday, 24 May 2012

Pirate Thursday!

Today is Pirate Thursday, in case you didn't know. Okay, well, it's Thursday...and my manicure/nail art design this week is pirates therefore Pirate Thursday! Usually you have a black and white theme when you see pirate skulls on flags but dag namit I am going to present you with a red pirate theme mani..with bling of course!

So, to start off I tried a Nubar base coat and decided to apply Kleancolor Red Heart (74) to all but my ring finger, and to my ring fingers I applied Kleancolor White (4).  Over the Kleancolor White I did a thin layer of China Glaze Rainbow which gives a blueish tinge in a certain light.


Kleancolor White and Red Heart


I then decided that the red needed some blinging up and put a layer of Kleancolor Red Hot (189) over the top.

Kleancolor Red HotKleancolor Red Hot
The picture on the left was how lovely it came out last night. I thought I would let it dry over night after the Kleancolor layering/melting off fiasco of last week and then this morning....the picture on the right is a big fat sheet imprinted mess on all the Kleancolor Red Hot layered nails. Bugger! :(

After a coat of Seche Vite though...things look much better! It filled in all the bedsheet imprints nicely. Yay!
Kleancolor Red Hot

Then onto stammmmmmmmpppppping..Pirate theme ahoy!
 (Gratuitous Artistic Instagram shot, shows how vibrant the red truly is.) 

Instagram red nail polish


                                        The Left Hand                                                       Left Thumb Design
Nail stamping art, pirate red and white themeNail stamping art, pirate red and white theme


                                           Right Hand                                                 Right Thumb Design

Nail stamping art, pirate red and white themeNail stamping art, pirate red and white theme

I used a mixture of plates, Bundle Monster, Fun Plate 2, MJ plate (both from Fab Ur Nails) and the OB plate I received the other day. I stamped with Kleancolor White and Sally Hansen White On quick dry. The Kleancolor was more opaque but harder to work with.

The 2 ring fingers (below) were stamped with Kleancolor Red Heart..it doesn't tend to stamp as cleanly as some and you have to be careful with the topcoat or there is bleeding. Wait for an hour or two for it to dry before the top coat! The blurriness you see is the stamp not the pic.

Nail stamping art, pirate red and white themeNail stamping art, pirate red and white theme


I finished the manicure off with INM Out the Door top coat. The glitter in the red hot layer really makes the polish look dynamic in the light...but not sure what to do about the layering/drying issue!

Hope you like my Pirate Thursday mani..it was challenging to get all the designs to stamp correctly with the new plates but I think I have the hang of it. Let me know your thoughts. Tomorrow Ulta3/Mode haul! :)