Showing posts with label Striping. Show all posts

Sunday, 23 November 2014

China Glaze Strawberry Fields and Maybelline Bleached Neons Tropink

Erm...Hi? Not sure if anyone really missed me, but yeah..there seemed to be an interruption to the regular programming. Namely my will to be creative was taken from me with some low level antidepressants for Irritable Bowel Syndrome. Did not enjoy at all. I did do my nails..but it was a struggle to be creative and motivated. I haven't joined in an AN Monday challenge despite best intentions, and my instagram has been neglected as well. Although I have learned to crochet in the meanwhile. I actually really love it and am working on presents for others at the moment :)

So, nails. Here is what I have had on for the last few days. This is a base of the Maybelline Bleached Neon Tropink on my middle 2 fingers, then I put some striping tape and did a coat of China Glaze Strawberry Fields on all fingers. I then put a coat of Dance Legend Orlando flakie coat on my first and last finger and attempted some stamping over the top. It's there but you can't really see it, but don't care because the flakie is awesome!

China Glaze Strawberry Fields with Maybelline Bleached Neon Tropink striping tape and Dance Legend Orlando
China Glaze Strawberry Fields and Maybelline Tropink 

China Glaze Strawberry Fields with Maybelline Bleached Neon Tropink striping tape and Dance Legend Orlando
 How awesome is the Flakie? So pretty!

So, I think I am back! Slightly irritable at the moment but improving daily..I bought some Lilypad Lacquer goodness as Nicole has a new collection or two out at the moment. If you want some awesome Holographic polish, glitter or Flakie, you can find it at her store here: Lilypad Lacquer

I wonder if you actually missed me? Let me know!

Tuesday, 6 May 2014

Illamasqua Glitterati - Glitter for Untried May

Hey guys, today I have for you a nail art look this is using Glitter for May 4th in the Untried May and The Amy's Untried Challenge. Now, I have quite a few glitter polishes that I haven't tried but when I was looking among all the pretty polish I realized I haven't tried either of the 2 Illamasqua's I own and Glitterati is the perfect cold weather color. For the base of this nail art look I used another untried OPI Meet Me on the Star Ferry, 2 coats with a top coat then I used striping tape placed at different thicknesses to create and increasing width stripe down each nail. Glitterati is a gorgeous maroon polish with holo gitter..so I did an accent nail with the full glitter polish in all it's glory.

OPI Meet Me On The Star Ferry with Illamasqua Glitterati striping nail art
 Pics are in a lightbox with flash


OPI Meet Me On The Star Ferry with Illamasqua Glitterati striping nail art
Holographic glitter goodness!

OPI Meet Me On The Star Ferry with Illamasqua Glitterati striping nail art

 The flash captures what I would imagine sunlight would, and OPI Meet Me on the Star Ferry has a surprising scattered holographic bling to it.Illamasqua Glitterati is lovely and squishy and the holo glitters are easy to apply with not much fishing required. I wish I had some daylight to take better pics but with 10 hour shifts and winter coming, it gets harder :( 

Saturday, 3 May 2014

Essie Bikini So Teeny with striping nail art

Heya! It's me..again..here is one of my mani's that I wore for Austism Awareness month in April :) Essie Bikini So Teeny is one of those polishes that everyone raves about..or hates! The color is gorgeous, the formula seems to be a bit hit and miss for some. To be honest, I don't have any problems with Essie's formula but I do tend to have the bottles with the etched Essie logo and not the printed ones. I wonder if that makes a difference?
For this look I used 2 coats of Essie Bikini So Teeny and a top coat. I then added a simple cross of striping tape and filled in the triangle areas with different blue polishes. The top one is Girly Bits Blue Eyed Lawyer, the glitter is Picture Polish Splash, Essence Bonnie on the left hand side and the blue holo is Lilypad Lacquer Deep Blue Seeing.

Essie Bikini So Teeny with Girly Bits Blue Eyed Lawyer, Lilypad Lacquer Deep Blue Seeing, Essence Bonnie and Picture Polish Splash


Essie Bikini So Teeny with Girly Bits Blue Eyed Lawyer, Lilypad Lacquer Deep Blue Seeing, Essence Bonnie and Picture Polish Splash

Essie Bikini So Teeny with Girly Bits Blue Eyed Lawyer, Lilypad Lacquer Deep Blue Seeing, Essence Bonnie and Picture Polish Splash

Essie Bikini So Teeny with Girly Bits Blue Eyed Lawyer, Lilypad Lacquer Deep Blue Seeing, Essence Bonnie and Picture Polish Splash

I loved Essie Bikini So Teeny and had quite a few compliments on the color. I especially liked the Girly Bits and Lilypad Lacquer polishes that I used in the nail art and I can't wait to use them as more than just an accent! Hope you liked this look as much as I did :)

Wednesday, 9 April 2014

Paint It Blue- China Glaze Frostbite with Striping

Hey guys! Happy hump day :) Today I have for you some pics of the next Paint It Blue manicure I wore for the month of April. Yes, it's various blue for the entire month here. Today I have a straight swatch of China Glaze Frostbite and then some nail art I did with it. The only downside of coming into winter here is that there was no sun for the nail art pics :( I am going to have to get my lightbox out soon methinks. I had a little trouble with Frostbite, it's a gorgeous electric blue shimmer, but it was thin as all get out so I had to keep shaking the bottle in between application on each nail..so it was a bit time consuming but very worth it..you think?

China Glaze Frostbite

China Glaze Frostbite

China Glaze Frostbite
Gah, so pretty! The electric blue with blue shimmer is purty. This was 2 coats with top coat :)

Now, I attempted a Waterfall mani with the striping from the cuticle..but I failed completely. So I am just calling this a striping nail art. I used Kleancolor Catch Me, China Glaze Bahamian Escape, Kleancolor Metallic Aqua and Ulta3 New Years Eve. I also did an accent nail with New Years Eve and Essie Shine of the Times.
China Glaze Frostbite with striping and glitter

China Glaze Frostbite with striping and glitter

China Glaze Frostbite with striping and glitter
 There was no sun for the stripe mani pics, sorry about that :( It looks pretty good in the pics but was better with the sun out! Not sure what to do about the thin formula..maybe leave the bottle open for a bit to thicken up? I am still going to be painting it blue with the next mani..going to try and hit some untrieds. Hope your week is going well, check you laters!

Wednesday, 19 March 2014

Kmart Pink Minx Skittles- taping, studs and glitter.

Hi guys! Today I have for you Pink Minx, which I wore a little while ago and I wanted to bling this lovely neon polish with some taping, studs and of course, a glitter accent nail. I do like my glitter accent nails and my ring finger seems to be the finger of choice! lol. Now, Pink Minx is a neon pink that I bought from Kmart for a whole $3 and I do love the formula, coverage and brush. Make sure you are well ventilated as they stink like Kleencolor polishes do! For this skittles mani I used some gorgeous neon studs I bought here, at Drama Queen Nails and placed them on my pointer finger. I did a taped off diagonal tip on my middle finger. I did a gradient of glitter using Crowstoes Heartless on my ring finger and I did a mani tip with some silver striping tape on my little finger :)


Kmart Pink Minx with neon studs, taping tip, striping tape and glitter gradient accent nail
Middle finger diagonal tape mani using China Glaze Something Sweet on the tip.

Kmart Pink Minx with neon studs, taping tip, striping tape and glitter gradient accent nail


Kmart Pink Minx with neon studs, taping tip, striping tape and glitter gradient accent nail

Kmart Pink Minx with neon studs, taping tip, striping tape and glitter gradient accent nail

 I wish I had captured the true beauty of Crowstoes Heartless, it's a gorgeous hot pink holographic glitter and I really didn't manage to get the best pic of it! Next time. I think I did pretty well with my taped tip look but you can see a little bit of tip wear as I wore this at work and worked pretty darned hard that day. I wash my hands and expose them to icky chemicals alot. Most of the girls laugh at my constant handcream/cuticle oil use but if I don't they get so dry. Plus I am still using some of the Essence Apple Cinnamon hand cream that came out last June (for $2 I may have quite a few!) and I love how it smells and how quickly it sinks in at work, and for $2 I don't feel bad for using heaps at work! Hope you are having a great day..I am still on holidays..talk to you soon! 

Monday, 29 July 2013

piCture pOlish Blog Fest 2013

Today I have for you Blog Fest 2013 hosted by piCture pOlish! Last year there was a reveal of wonderful collaboration shades of polish for the Blog Fest. This years Blog Fest theme is Year of the Blogger. This celebrates all the wonderful nail polish bloggers out there, what we do and a chance to show off our nail art. How awesome is that? The challenge for today is create the "most amazing nail art ever' with three polish provided by piCture pOlish. 

Blog Fest 2013 Picture Polish Aphrodisiac, Splash and Hot Lips Nail Art Manicure
piCture pOlish manicure using piCture pOlish Aphrodisiac, Hot Lips and Splash

Picture Polish Aphrodisiac, Splash and Hot Lips
 L-R piCture pOlish Aphrodisiac, Splash and Hot Lips

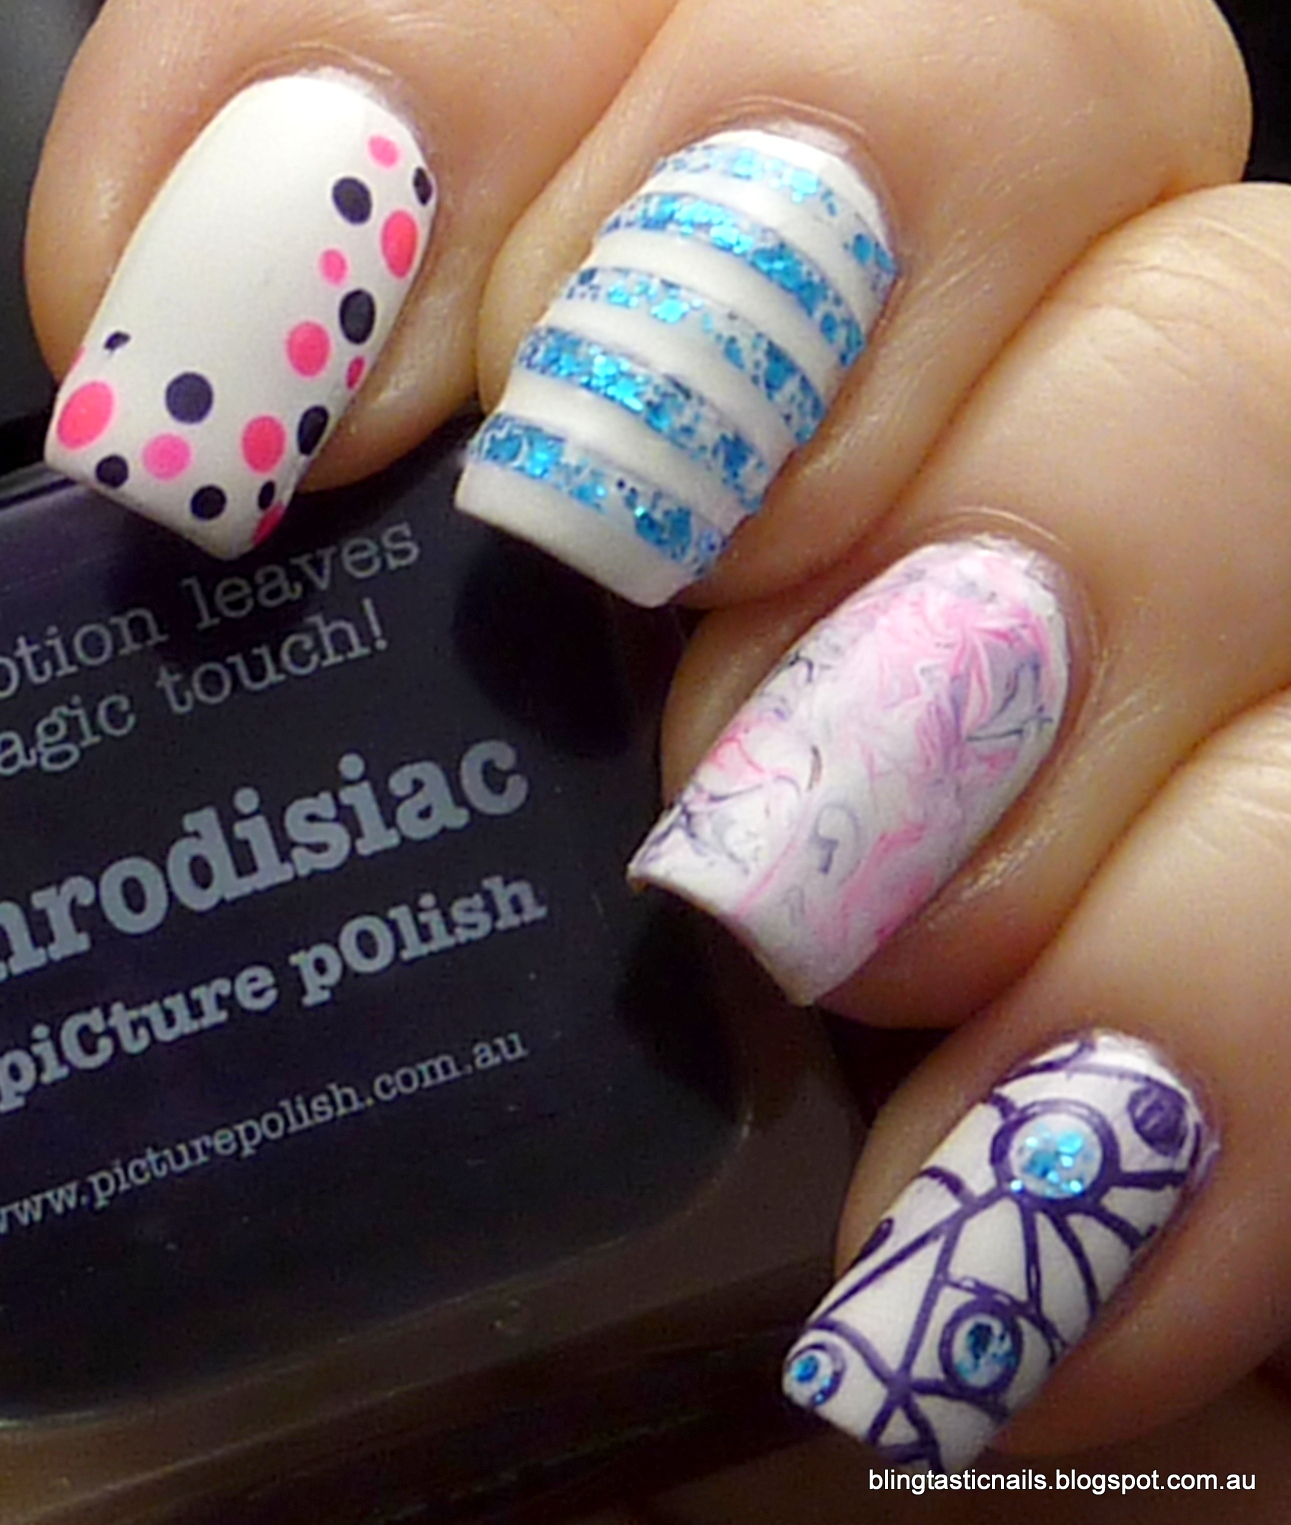
piCture pOlish sent me Aphrodisiac, which is a very dark purple, Splash a lovely blue multi shape glitter and Hot Lips a neon pink. Such different polishes, but all gorgeous in their own right. To make sure each polish would pop with the manicure I did a base of white and applied different nail art over the top. So how did I create the look below?

Blog Fest 2013 Picture Polish Aphrodisiac, Splash and Hot Lips Nail Art Manicure

Thumb Nail Art- 2 coats of piCture pOlish hot lips with piCture pOlish Splash applied at the base of the nail and dragged upwards to the tip. A simple but very effective glitter gradient.

Picture Polish Hot Lips and Aphrodisiac dotting manicure
First Finger- White base with dot nail art using piCture pOlish Hot Lips and Aphrodisiac

I used grease proof paper and placed some polish on it. Using a dotting tool I placed dots on my nail in a J-shape on the white base, alternating the colors and sizes.


Picture Polish Splash stripe manicure
Middle Finger- White base with piCture pOlish Splash polish stripes

I painted 2 coats of piCture pOlish Splash on grease proof paper and when the polish was dried I cut it up into strips and placed it over a white base on my nail. Finished with a topcoat :)

Picture Polish Aphrodisiac and Hot Lips Drag Marble
Ring Finger- Drag marble nail art.

Picture Polish Aphrodisiac and Hot Lips Drag Marble
This is kinda hard to show on the nail, but imagine it's my nail above. I painted white polish onto my nail, then dropped drops of piCture pOlish Hot Lips and Aphrodisiac placed on the white and whilst all polish was wet, dragging a design with a fine dotting tool as above.

Picture Polish Aphrodisiac Stamping with Picture PolishSplash accent glitter
 Little Finger- Stamping with piCture pOlish Aphrodisiac and accents of Splash dotted on.

I used Pueen stamping plate 38, the design very left in the above picture, and using piCture pOlish Aphrodisiac in the design I transferred this onto my nail. Then when the design dried I used my dotting tool to add accents of piCture pOlish Splash

Blog Fest 2013 Picture Polish Aphrodisiac, Splash and Hot Lips Nail Art Manicure
The end result of a few nail art techniques and some awesome polish!

Blog Fest 2013 is happening all over the world, so keep an eye out for nail art with polish colors that you love. All designs will be posted to the piCture pOlish Pintrest Page and the one with the most 'likes' will be invited to create a collaboration shade, so make sure you head on over and like your faves :)

You can check out the other shades of lovely polish sold at the piCture pOlish website here. As I am in Australia, I was sent the polishes directly from piCture pOlish but other alternatives to get your hands on these polishes (especially for the international peeps) can be found at the piCture pOlish Network page here.

You can also keep up to date with latest polish releases and  awesome manicure looks created with piCture pOlish polishes at either piCture pOlish Pintrest, piCture pOlish Facebook, piCture pOlish Twitter , piCture pOlish You Tube or my favorite piCture pOlish Instagram.

Hope you enjoy the Blog Fest 2013!

Sunday, 12 May 2013

One Year Blogiversary and Essie In the Cab-ana Kitchen Sink Mani

What? I've only just clued on that it's been a year since my first blog post..time does fly! So 175 posts later and I still a passion for polish and blogging as well as learning so much about polish, indie polishes and nail art techniques. I've met some amazing polish makers, nail artists and just plain out nice people in the nail polish world that I am pretty happy to be a very small part of the community. 

Today I am going to do a comparison post (and cringe at my cuticles!) as I started to paint my nails to stop biting them. So I was pretty bad at biting my nails and cuticles. It's taken ages to get my poor maligned fingers into better condition. My very first pic was taken on my iphone. So will the current mani that I am wearing so we are comparing apples with apples. We all started somewhere!

So a pic from today :)
Essie In the Cab-ana with L-R, Striping and Kleancolor Metallic Sapphire, Striping tape and rhinestone, stamping with Kleancolor Metallic Sapphire and China Glaze Glistening Snow dots, French tip with loose glitter.

Blue Skittles Mani with silver stamping using Bundle Monster plates

Well, that wasn't so bad was it? Okay, if I am being picky with the comparison - my nails are longer, less cuticle flooding, better cuticle condition..I think my stamping was pretty good though back then! Helped that I unknowingly had one of the best stamping silvers with China Glaze Millennium :) 
I've been prattling about a Giveaway, I guess the celebration of blogging for one year should be a good a reason as any. As soon as I can get my butt into gear I will do it.. :)