Showing posts with label Black. Show all posts

Monday, 2 June 2014

SIMPLES- Week 3, Ombre- Grey to Black

Hi guys! It's been a little while...life has gotten in the way of blogging. I have been polishing and I'll try and catch up a bit this week with my posts. I am currently trying to stick to a challenge or two. Today I have for you the SIMPLES challenge- Nail Art from Muggle to Mastery, which is a basics nail art onwards created by The Crumpet. You can check out Crumpets post here. This week is week 3 (I have one and two somewhere, erm, yes..let me go find the pics) anyways this is Ombre. Ombre is best described by The Crumpet as "Ombre literally means shadow, in French.  An ombre mani, therefore, is one where the nails move through varying SHADES of the same colour, from light to dark, or dark to light, across the entire hand". Good to know how this differs from gradients!

 Since I am trying to do my nails and nail art with my untrieds still, I did a grey to black Ombre today. Now warning pics, with thumbs in it. Not my thing, haven't figured out how to do it gracefully yet so..sorry there.

Grey to Black Ombre with Nubar Citadel, China Glaze Recycle, China Glaze Concrete Catwalk, China Glaze Haunting and Nails Inc Leather Effect Noho
L-R, Nubar Citadel, China Glaze Recycle, China Glaze Concrete Catwalk, China Glaze Haunting and Nails Inc Leather Effect Noho.

Grey to Black Ombre with Nubar Citadel, China Glaze Recycle, China Glaze Concrete Catwalk, China Glaze Haunting and Nails Inc Leather Effect Noho

Grey to Black Ombre with Nubar Citadel, China Glaze Recycle, China Glaze Concrete Catwalk, China Glaze Haunting and Nails Inc Leather Effect Noho

Grey to Black Ombre with Nubar Citadel, China Glaze Recycle, China Glaze Concrete Catwalk, China Glaze Haunting and Nails Inc Leather Effect Noho

 I threw in a few doozys at the end with this Ombre..a glitter/black and a texture. Not sure it's strictly in the rules, but ya know, it's nails and nail art so why not have a little fun! Catch you in 2 days..I have a day off and hope to sort out the posts lying around on my puter! Mwah xoxo.
Saturday, 15 February 2014

Black Cat Lacquer Bloody Kisses and piCture pOlish Scarlett

Hey guys! Having a difficult week, so a quickie for today. I had my computer rebuilt which has resulted in a lack of posts so I hope I can catch up with another post or 2 in the next few days. Today I have for you a variation on the Valentines Day mani I did on Monday, which switched up with an accent nail of piCture pOlish Scarlett with stamping. I think I prefer this version!
Black Cat Lacquer Bloody Kisses and Picture Polish Scarlett


Black Cat Lacquer Bloody Kisses and Picture Polish Scarlett


Black Cat Lacquer Bloody Kisses and Picture Polish Scarlett

Okay, I hope you are having a great weekend. I'll try and catch up with some more interesting swatches and nails of the day for the rest of the week :)

Monday, 10 February 2014

ANMonday Valentines Day

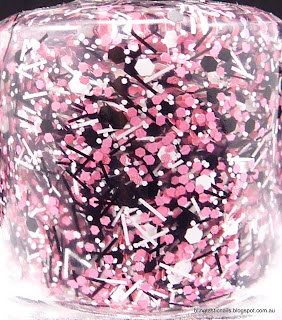
Hey Guys, today I have for you the ANMonday challenge of Valentines Day! V-Day isn't far away and is a cute Hallmark occasion which is great if you have a partner, even better if you have a partner that believes in V-day hype...or like me, who has a partner that doesn't believe in hallmark occasions, it's just another day :) So today I have for you what my V-Day mani evolved into. I started off with a lovely pink holo, but it just wasn't what I wanted, so off it came and instead I went with  Sinful Colors Black on Black, a top coat of Black Cat Laquer Bloody Kisses except for stamping on my ring and thumb finger which was hearts in various forms. I used Lilypad Lacquer Pink Flamingo to stamp. Here is the end result :)
Valentines Day Black Cat Lacquer Bloody Kisses with Lilypad Lacquer Pink Flamingo stamping
 Black Cat Lacquer Blood Kisses 2 coats over Sinful Colors Black on Black. Stamping with LilyPad Lacquer Pink Flamingo

Valentines Day Black Cat Lacquer Bloody Kisses with Lilypad Lacquer Pink Flamingo stamping
 Gorgeous holo glitters!

Valentines Day Black Cat Lacquer Bloody Kisses with Lilypad Lacquer Pink Flamingo stamping
 Lilypad Lacquer Pink Flamingo stamps a treat!

Valentines Day Black Cat Lacquer Bloody Kisses with Lilypad Lacquer Pink Flamingo stamping
 Right thumb stamping, Hearts and Crosses

 Left thumb stamping, straight out hearts :)

Valentines Day Black Cat Lacquer Bloody Kisses with Lilypad Lacquer Pink Flamingo stamping
Left hand stamping. Love the heart roses!

Valentines Day Black Cat Lacquer Bloody Kisses with Lilypad Lacquer Pink Flamingo stamping
 Full sun :)
 The glitters in Black Cat Bloody Kisses is holo and amazing! I really wanted Bloody Kisses to be a fully coverage glitter polish, but instead it's a grey toned jelly with square and hex glitters with a microglitter through it and a topper only..so pretty though :) I stamped with Lilypad Lacquer Pink Flamingo, which is awesome to stamp with and oh so blingy pretty. I loved it. I'll try and post another V-Day mani before V-day..have a good Monday!

Sunday, 19 January 2014

Vincent turns One! Zebra Manicure :)

Vincent is my gorgeous little nephew from my only sister, and today was his One Year Old birthday party! He's a happy little man who is growing up fast and is a delightful baby who is pretty placid and happy most of the time. Apparently he takes after me in that regard, lol. Today my sister hosted his First birthday party with an animal theme, and I dressed up as a Zebra and my husband was an animal watcher on Safari.

My husband and Vincent with his puppy costume!

 So, of course I had to do the nails to go with the theme and I kinda went over the top with my Zebra manicure. For the manicure I used China Glaze Dandy Lyin Around, a coat of SnowGlobe and them stamped with Lilypad Laquer Rainbows in Space. I also did an accent nail with Lilypad Lacquer Rainbows in Space with a coat of Sparkles by Julie Sugah!

China Glaze Dandy Lyin' Around, China Glaze Snowglobe and Lilypad Lacquer Rainbows in Space
Not sure this could be ANY blingier! LOL

China Glaze Dandy Lyin' Around, China Glaze Snowglobe and Lilypad Lacquer Rainbows in Space
I stamped the Zebra stripes with Bundle Monster plates :)

China Glaze Dandy Lyin' Around, China Glaze Snowglobe and Lilypad Lacquer Rainbows in Space
Insane Rainbows on the Ring Finger!

Now I also did matching toenails..so warnings, a foot photo ahead!

China Glaze Dandy Lyin' Around, China Glaze Snowglobe and Lilypad Lacquer Rainbows in Space

Now, I know the black stamping wasn't very black and there was alot going on here. If I was doing this to look like real Zebra stripes, I would have just done a white base with Dandy Lyin Around, and stamped with a strong black. But I wanted the glittah and wanted the holo. I was greedy. I asked my husband if it was a bit over the top..he didn't think so! LOL. Anyways. I am going to keep the toes for a week or so, as bling toes always work. Unfortunately, I need work appropirate nails tomorrow, so this is coming off tonight :(

Wednesday, 27 November 2013

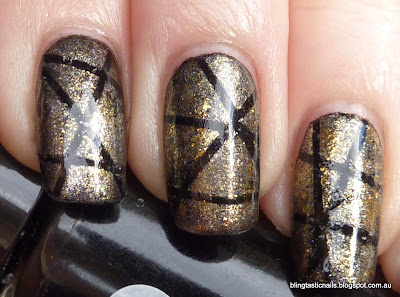
Black, Gold and Silver striping manicure

Hey hey, I was feeling productive today, but that's waning off. Was meant to have to carpets steam cleaned but that didn't go off as planned. But that's okay, got a quote on air conditioning for our upstairs bedroom and caught the gardener to come an fix our dismal back yard (erm, outta control weeds anyone!). So I am feeling slightly happier that I am getting stuff done.
 Today I have an idea taken from the Aussie Nails Monday chicks..which was a mani with gold, silver, white or black using Aussie Indie polishes. I do have quite a few Aussie Indi Polishes but it was late in the day so I just used the theme with any old polishes I could easily put my hands on! Here is the end result.

OPI Goldeneye, OPI Bond, James Bond, China Glaze Cosmic Dust and Savvy Starburst striping manicure
 For this look I painted a coat of MUD Dark Room, waited for it to dry and applied striping tape in patterns. I then sponged over the top in gold with OPI Goldeneye and Bond, James Bond and silver colors of China Glaze Cosmic Dust and Savvy Starburst.

OPI Goldeneye, OPI Bond, James Bond, China Glaze Cosmic Dust and Savvy Starburst striping manicure

OPI Goldeneye, OPI Bond, James Bond, China Glaze Cosmic Dust and Savvy Starburst striping manicure

OPI Goldeneye, OPI Bond, James Bond, China Glaze Cosmic Dust and Savvy Starburst striping manicure

This look was particularly sparkly but difficult to catch all the different characteristics of each polish. There was holographic, sparkly, large glass flecks all thrown in there. I am sure I could have randomized my striping a bit more but I just can't help myself, I like them to look the same! 

It's hot here today I might put on a holo and catch a some sun and rainbows..see you soon!

Monday, 1 July 2013

ANMonday- China Glaze Sci Fi

Hi Guys, long time no post! I've been out of control busy and falling asleep on the couch after work last week. I don't know what is up with me, maybe I am getting sick (sheesh, not again). Either way between life getting in the way of polish and general fatigue..I have been pulling my hair out to try and figure out Rafflecopter for a giveaway. Okay, so maybe I spent 10 minutes on it before I gave up, but I will give it another go. I want to do a giveaway for 100 followers, darn it!! If anyone has any tips, email me :)

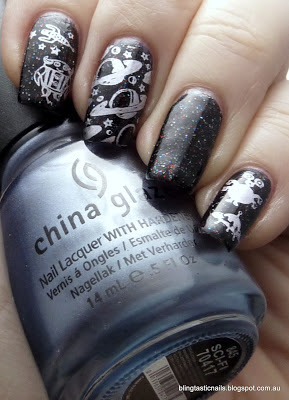
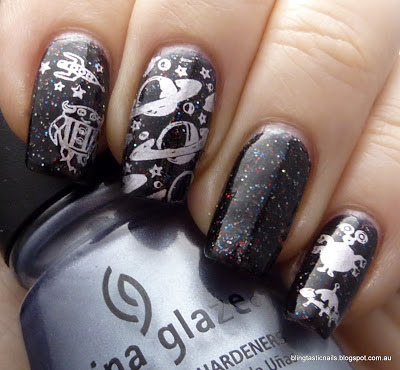
Today's ANMonday theme is Sci Fi, now me being a smarty pants I decided to be literal and did a mani using China Glaze Sci-Fi :) Sci-Fi is an amazing light silver blue/purple polish that stamps like a boss, so of course to keep in theme I rolled out the aliens and outer space ...
Ulta3 Triple Threat with China Glaze Sci-Fi Stamping
 Ulta3 Triple Threat with China Glaze Sci-Fi stamping using Cheeky Plates


Ulta3 Triple Threat with China Glaze Sci-Fi Stamping

Rocket Ships, Aliens and Galaxys oh my!

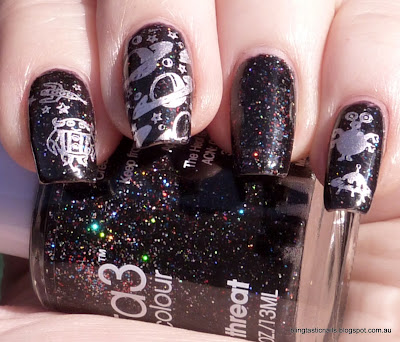
Ulta3 Triple Threat with China Glaze Sci-Fi Stamping
I particularly like the Alien on my little finger, he's pretty cute :)


Ulta3 Triple Threat with China Glaze Sci-Fi Stamping
One last shot, in the sun to show the sparkle of Ulta3 Triple Threat

So, I really like how this turned out..Ulta3 Triple Threat is an awesome black polish with multi color glitters which is so pretty. CG Sci-Fi stamps and contrasts nicely. Do I love my photos?? Erm, no..they suck a little bit. Sorry about that. Just one more thing to add to my NQR week! Anyways, I feel good that I got a post out and participated in ANMonday. Hope you guys are having a great week..filled with polish and time for polish :)

Oh, PS..Google Reader, going away...blah blah. Make sure sure you follow me with Bloglovin' to keep up with my posts, stellar or not as they are sometimes! LOL.

Monday, 20 May 2013

Aussie Nails Monday- Lace..and Leather and Curtains!?

Evening chicks, welcome to tonight's quickie..a quick blog post that is ;) I spent the weekend doing a post for a bit later down the track that was super impossible to photograph color-true so I had 4 different attempts at various times of the day with 2 different cameras..it did my head in! I had time to do something for today's Aussie Nails Monday where the theme was Lace. I wanted to make this look tough and to stamp with my new Pueen plates I received in a group buy organised by one of the awesome Aussie Nails chicks.. thanks Nicole! Anyways, my take on this was Leather and Lace, which then turned into Leather and Lace Curtains..take a look!

Nails Inc Leather Noho with black and white lace stamping
 L-R, Nails Inc Leather Noho, CG Liquid Leather stamped with Ulta3 Lily White, same for ring finger except reversed and Nails Inc Leather Noho again.

Nails Inc Leather Noho with black and white lace stamping
I framed the middle and ring finger with "curtains"

This was a fun look and it sort of evolved as I did it. I was keen on the leather and lace, but my friend Emma said the stamping looked like old fashioned curtains..and it does! So I added the "curtains" to frame the lace. This it worked best on the black with white stamp I feel and the other was a bit of a fail, but I gave it a go! I really loved Nails Inc Leather effect in Noho, it just so tough looking. I am keen to play around with it a bit more.
Well, this is the end of the quickie...hope your Monday was awesome!

Check out the other awesome Aussie Chicks


Members


Caylah -
 
Tash -
 
 
Tracy -
 

Saturday, 28 July 2012

OPI Black Spotted over Layla Metal Chrome

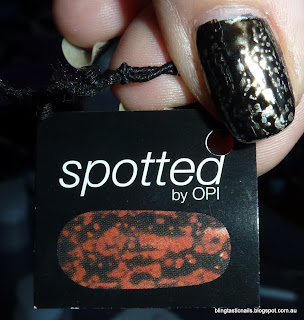
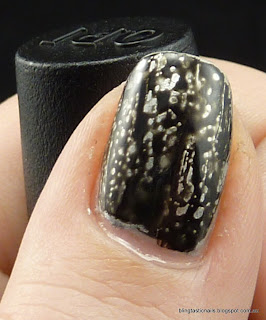
Hey All! Tonight I have a post for you with a special polish. Well, to me most polishes are special in their own way :) This one is a cousin of the shatter polishes and a part of the European OPI Spiderman collection- it's called Black Spotted. For those of the polish world you all know of Black Spotted. Love it, hate it, not sure about it. I have been through all those phases. I knew I had to have it though to give it a chance in person... it's how I roll :)  So onto ebay I went as I have no European connections in da polish blogging world (me the newbish blogger) and last week my OPI Black Spotted arrived :) Here is my first attempt at Black Spotted..onto the photo spam!

OPI Black Spotted and Layla Metal Chrome
 OPI Black Spotted, yes..I dipped my fingers in oil!

What did I use?:  Ulta 3 Base Coat
                                                  Layla Metal Chrome - 1 Coat
                                             OPI Black Spotted- I Coat
                                   Seche Vite Top Coat

OPI Black Spotted and Layla Metal Chrome

OPI Black Spotted and Layla Metal Chrome

OPI Black Spotted and Layla Metal ChromeOPI Black Spotted and Layla Metal Chrome
Macro without and with flash 

OPI Black Spotted and Layla Metal Chrome
Black Spotted with Flash

So, do my nails look the picture with the instructions?
OPI Black Spotted and Layla Metal Chrome
I'll let you decide..

Thoughts on Black Spotted, do I love it, YES! It's awesome in an oily looking kind of way...it's so interesting. I was going for a blingy through the darkness look but I feel that because the Black Spotted doesn't "shatter" cleanly I got a bit of bronzish discoloration in the holes. I also think the size of the spottedness holes depends on the polish and as I had a majority of small ones I attribute this to the consistency of the Layla Metal Chrome. I can't wait to try this again over a few different polishes and see the results!

Love, meh or hate?

Wednesday, 11 July 2012

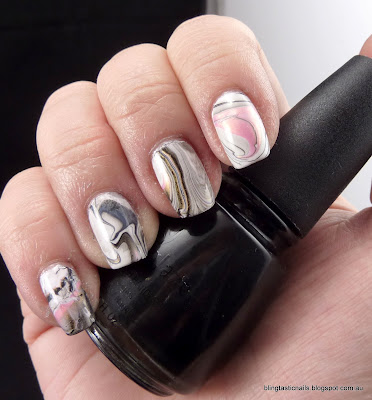
Kleancolor Salsa, Sally Hansen White Out and China Glaze Liquid Leather Watermarble

I stayed up wayyyyy to late last night and as a result of wandering around the internets and Youtube whilst watching North and South (Elizabeth Gaskell's book in TV mini series), I woke up this morning with an attitude of "I want to try water marbling, it looks great, lets give it a go". So, I sat there thinking about a color scheme that is work appropriate...looked at my bottle of Nostalgic As If! and decided I wanted to try a white, pink and black water marble :) I guess my hands will be in my pockets alot tomorrow!

Here is my bottle of inspiration:
Nostalgic Lacquer As If!Nostalgic Lacquer As If!
Nostalgic As If! and macro of As If!

Sally Hansen White on, Kleancolor Salsa and China Glaze Liquid Leather

Here is the colors I chose to marble with were Sally Hansen White On, Kleancolor Salsa and China Glaze Liquid Leather.

 The way I water marbled was to use a very small glass ie. Sherry/port glass, similar to this size
It has a small water surface area, enough for 1 finger. I also used a toothpick, cotton bud and Micropore (Nursing tape) to create the effect. You can search you tube for great tutorial on the best was to water marble. I chose to tape around each nail to cover my finger and not get polish on my hands. This worked pretty well for minimizing mess and clean up. Not sure how regular tape would have done!

And here is the effect, the watermarble was done over Ulta3 base coat and 1 coat of Sally Hansen White on, topped with Seche Vite. Please ignore my dry cuticles!
Pink, white and black water marble effect mani
Left Hand Water Marble Effort

Pink, white and black water marble effect mani
Left Thumb

Pink, white and black water marble effect mani
 Right Hand

Pink, white and black water marble effect mani
Right Hand

Pink, white and black water marble effect mani
Right Thumb

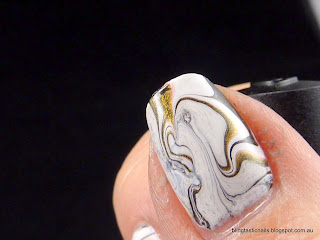
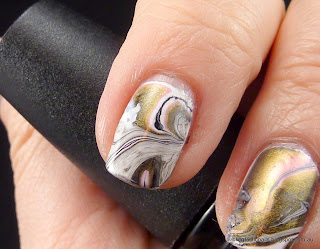
Here is a few Macro shots of the nails I particular like :)
Pink, white and black water marble effect maniPink, white and black water marble effect mani

Water marbling isn't that easy to get the design you want, it's messy but the clean up isn't too terrible for the end result. There are a few different methods, I was happy with the taping method and how the water marbling turned out :) Kleancolor Salsa turned out to be almost a 2 in 1 polish as the pink/gold shimmer seemed to separate in the water resulting in the bronze color you see in between the pink and black and I so glad that it happened, it made the mani really pop and blinged it up a bit! I did 2 nails over again as they had too much dark/black pigment with no swirly pattern.

Overall I was pretty chuffed with how my first attempt turned out. Hope you liked this mani and have had a go at water marbling, it's pretty fun!