Middle finger diagonal tape mani using China Glaze Something Sweet on the tip.
Come to the darkside of the polish world, where there is never enough polish, nail art or glitter!
Showing posts with label Gradient. Show all posts
Showing posts with label Gradient. Show all posts
Wednesday, 19 March 2014
Kmart Pink Minx Skittles- taping, studs and glitter.
Hi guys! Today I have for you Pink Minx, which I wore a little while ago and I wanted to bling this lovely neon polish with some taping, studs and of course, a glitter accent nail. I do like my glitter accent nails and my ring finger seems to be the finger of choice! lol. Now, Pink Minx is a neon pink that I bought from Kmart for a whole $3 and I do love the formula, coverage and brush. Make sure you are well ventilated as they stink like Kleencolor polishes do! For this skittles mani I used some gorgeous neon studs I bought here, at Drama Queen Nails and placed them on my pointer finger. I did a taped off diagonal tip on my middle finger. I did a gradient of glitter using Crowstoes Heartless on my ring finger and I did a mani tip with some silver striping tape on my little finger :)
I wish I had captured the true beauty of Crowstoes Heartless, it's a gorgeous hot pink holographic glitter and I really didn't manage to get the best pic of it! Next time. I think I did pretty well with my taped tip look but you can see a little bit of tip wear as I wore this at work and worked pretty darned hard that day. I wash my hands and expose them to icky chemicals alot. Most of the girls laugh at my constant handcream/cuticle oil use but if I don't they get so dry. Plus I am still using some of the Essence Apple Cinnamon hand cream that came out last June (for $2 I may have quite a few!) and I love how it smells and how quickly it sinks in at work, and for $2 I don't feel bad for using heaps at work! Hope you are having a great day..I am still on holidays..talk to you soon!
Wednesday, 12 March 2014
A-England BriarWood, Ruby Wing Strawberry Shortcake and Gold Stamping
Hi guys! So you saw a swatch of A-England Briarwood that I wore a little while ago. Of course I couldn't leave it well alone and had to bling up Briarwood with some glitter, a gradient and stamping. I decided to accent my ring finger with Ruby Wing Strawberry Shortcake which is a gold glitter that turns a lovely purple in the sun. I did a mini gradient with Briarwood and Dance Legend Roz on my ring finger and I stamped with China Glaze passion.
Holo sparkles!
The holographicness of Briarwood is still gorgeous! :)
I stamped off center on my middle finger, but I don't care! LOL
Completely love how you can have a base of a lovely polish and completely change it up to something slightly different and individualize your look! I love Ruby Wing Strawberry Shortcake and wish I had captured a pic of it in it's gold sparkly state not in the sun, oh well. It's super pretty under UV light in it's purple state :) The gold stamping is a classic contrast and makes this mani elegant I think. Hope you enjoyed this look..and you have a great day..
Saturday, 20 July 2013
Aussie Nails Monday..erm, Saturday- Purple
Hello everyone! Okay, so this post is super dooper late. I will preface with..I did do this on Monday but didn't like the photos. But today as I look at them again after really busy week and a good sleep, they don't suck that much! So Aussie Nails Monday this week was Purple. So I picked 3 purples I liked and squished them together and stamped :) Some mani's work just like that, tee hee.
I really loved this in person, but unfortunately it didn't fully translate in the pics quite as well. I should have chosen a less dark purple the middle color as it looks a bit bottom heavy. But meh! It's still purple and purple is awesome:) I have to try and get a better picture of Pretty Serious Purple Monkey Dishwasher as this polish is Ah-may-zing! Go get yerself it..right now..you will love it! Sorry this post wasn't earlier..and like, on a Monday..but it's before the next challenge which is Magical.
For this I used a base of China Glaze Light as Air, and then sponged CG Light As Air, CG Grape Pop and Pretty Serious Purple Monkey Dishwsher. Stamping with Bundle Monster Holiday Plates with CG Millennium.
A bit bottom heavy with the darker purples, but I still love it!
Labels:
China Glaze,
Gradient,
Pretty Serious,
Purple
Thursday, 26 July 2012
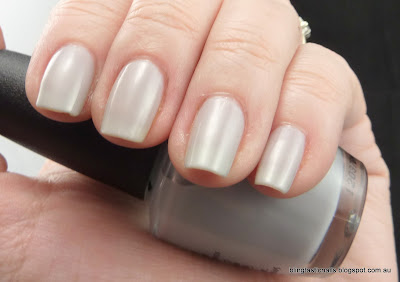
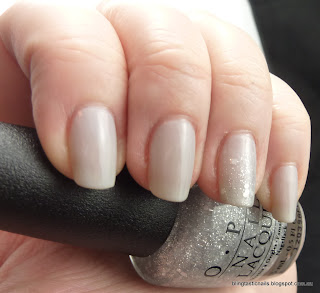
OPI My Pointe Exactly with Pirouette My Whistle
I have been pouring over the swatches of the OPI Ballet Collection for a little while and last week I finally got my grubby little hands on some of the lovely little sheer bottles of goodness. Yes, it was hard to decide on which to get. Yes, I got most of them! LOL. Tonight I am going to show you a swatch of My Pointe Exactly and Pirouette My Whistle.
Now, the whole point of a sheer polish is to be able to see your nail underneath the polish and have a visible nail line which may not be everyone's favorite thing. Most of the Ballet range are great for sheerness, but My Pointe exactly is a grey, and a sheer grey can sometimes look like dirty nails... so for this particular look I did 4 coats of polish to make sure there was some opacity. Piroeutte my Whistle is the glitter that goes with the whole collection and does look lovely for the accent nail, so much more shimmery and sparkly in real life :)
Have you got these sheer polishes in your collection?
My Pointe Exactly and Pirouette My Whistle
Macro of Piroeutte My Whistle
My Pointe Exactly without and without flash, this is 4 coats with no Top coat
Not so visible nail line!
Accent with Pirouette My Whistle
Lovely silver glittery sparkle :)
Have you got these sheer polishes in your collection?
Monday, 25 June 2012
Kleancolor Sandstone, Ulta3 Early Grey and Ulta3 Gold Rush Fever Gradient
Tonight, I am going to show you a lovely neutral gradient mani that I did after my Flying Dragon Floam mani peeled off after I may have used Ulta3 Non Chip top coat instead of the base, oopsie! I will show the result in just a moment, it's not exactly super pretty, but it's art I tell you..art! LOL. The colors I used are here:
But first, I don't usually do rants because you always upset someone, but I've just read something on another blog of whose name I won't mention because she doesn't deserve it. Seriously. I am that so astonished and incensed at what I read that I am not going to mention her name, but I am sure you can guess who/what it's about with recent polish world goings on. ANY respect I had for this polisher as a person has gone, gondidy, gone, gone. I am not even going to go into what it says but it left me thinking "Oh my giddy aunt and are you freakin' serious?" I haven't read anything so delusional, nor more clarifying of how I feel about the whole thing. I was a bit Switzerland on the whole thing until today. Now I understand why a few people reacted like they did and their actions. My actions will be to not enable any further delusions of grandeur ...do you think the average chick wants polish at super inflated prices supported by the creator? Not this one. Simple as that.
Anyways, moving forward, I hear Dollish, Pretty & Polished AND Crows Toes have joined Llarowe..so exciting! I have managed to order some Dollish polishes and am waiting for them. I also have some Pretty & Polished polishes which I love and was sad when she announced that she wasn't going to ship internationally. Also was lusting after some of the Crows Toes polishes but again no international shipping, now not a problem! I shall make some mine :) Lets go forthwith onto the gradient mani!
The colors I used, Kleancolor Sandstone (42), Ulta3 Gold Rush Fever and Earl Grey. I was hoping to achieve a neutral but still interesting mani! I applied Ulta3 base coat, 2 coats of Kleancolor Sandstone. Then took a makeup sponge and painted 3 lines of polish with Kleancolor Sandstone at the top, Gold Rush Fever in the middle and Earl Grey down the bottom. The polish lines made up the length of my nail and then I dabbed and moved the sponge up and down slightly. This is the result.
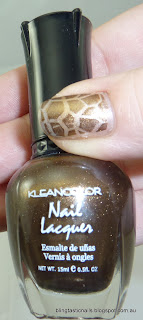
The stamping transforms this gradient mani from pleasant to great. I particularly like the thumbs as one looks very giraffe pattern like and the other thumb looks snake skin like! A very happy co-incidence. This also answers my posed question does Kleancolor Coffee Addict stamp well? Yes, yes it does. I did a top coat with Seche Vite and there was no bleeding of the stamped design as with some Kleancolor colors.
Phew, that turned out to be a bit of a marathon post..I hope you didn't mind and congrats if you made it all the way to the end! Hope your week is going well, I get to sleep in tomorrow before my shift and am mightly looking forward to it :)
But first, I don't usually do rants because you always upset someone, but I've just read something on another blog of whose name I won't mention because she doesn't deserve it. Seriously. I am that so astonished and incensed at what I read that I am not going to mention her name, but I am sure you can guess who/what it's about with recent polish world goings on. ANY respect I had for this polisher as a person has gone, gondidy, gone, gone. I am not even going to go into what it says but it left me thinking "Oh my giddy aunt and are you freakin' serious?" I haven't read anything so delusional, nor more clarifying of how I feel about the whole thing. I was a bit Switzerland on the whole thing until today. Now I understand why a few people reacted like they did and their actions. My actions will be to not enable any further delusions of grandeur ...do you think the average chick wants polish at super inflated prices supported by the creator? Not this one. Simple as that.
Anyways, moving forward, I hear Dollish, Pretty & Polished AND Crows Toes have joined Llarowe..so exciting! I have managed to order some Dollish polishes and am waiting for them. I also have some Pretty & Polished polishes which I love and was sad when she announced that she wasn't going to ship internationally. Also was lusting after some of the Crows Toes polishes but again no international shipping, now not a problem! I shall make some mine :) Lets go forthwith onto the gradient mani!
The colors I used, Kleancolor Sandstone (42), Ulta3 Gold Rush Fever and Earl Grey. I was hoping to achieve a neutral but still interesting mani! I applied Ulta3 base coat, 2 coats of Kleancolor Sandstone. Then took a makeup sponge and painted 3 lines of polish with Kleancolor Sandstone at the top, Gold Rush Fever in the middle and Earl Grey down the bottom. The polish lines made up the length of my nail and then I dabbed and moved the sponge up and down slightly. This is the result.
I like the foil shiny effect, even though Earl Grey is a creme
Beige, Gold, Taupe gradient with flash
With a change in light/angle the gold can look gold or bronze, the bronze doesn't mesh quite as well.
After a day I tired of the neutralness and thought, stamping..have at it. I'd swatched Kleancolor Coffee Addict previously and thought it would go well, so did a few accent stamping nails to make this mani bling a bit :)
Left hand stamping using Konad and Bundlemonster
Left Thumb stamping with Cheeky Plates
Right hand stamping with Cheeky plates and Bundle Monster
Right Thumb without and with flash
The stamping transforms this gradient mani from pleasant to great. I particularly like the thumbs as one looks very giraffe pattern like and the other thumb looks snake skin like! A very happy co-incidence. This also answers my posed question does Kleancolor Coffee Addict stamp well? Yes, yes it does. I did a top coat with Seche Vite and there was no bleeding of the stamped design as with some Kleancolor colors.
Phew, that turned out to be a bit of a marathon post..I hope you didn't mind and congrats if you made it all the way to the end! Hope your week is going well, I get to sleep in tomorrow before my shift and am mightly looking forward to it :)
Sunday, 27 May 2012
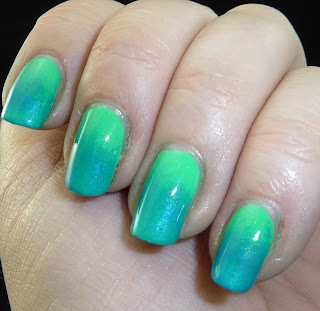
Green and Blue Gradient with Stamping
I think that is all anyone has been saying on the nail polish blogs! I must admit the bandwagon was very tempting, so I took the leap and attempted my first Gradient Manicure tonight. I had read all about how to do it on the tutorial on The Nailasaurus Blog and had a look for a sponge that matched what she used. Unfortunately I didn't have any :( I did have some brand new round make up sponges that you put foundation on with, so thats what I used!
The colors I chose to gradient were Ulta3 Mojito, China Glaze Custom Kicks and China Glaze Towel Boy Toy.
Here is the obligatory bottle pics!
As per the Nailasaurus tutorial I put on 2 coats of the lightest color, Mojito, after Ulta3 Base Coat. I thought this would be easy to apply but it's was difficult as it dragged and caused bald spots if I wasn't careful. It turned out nicely though and dried pretty quickly. I might put some thinner in for next use though!
Then I tried to mix the 3 colors on a piece of baking paper and swirl with a toothpick as per the tutorial. This so didn't work for me with the sponge I had. So I cut my sponge in half and dampened the sponge to stop the polish bleeding through too quickly. Here is the sponge I had. I used the middle thin edge to stamp.
I then applied Mojito, Custom Kicks and Towel Boy Toy directly to the sponge in small stripes and just dabbed onto my nail with Mojito at the cuticle and the Towel Boy Toy at the end of my nail. I dabbed up and down and side to side until I was happy. I then cleaned my cuticles and applied Seche Vite as my top coat. Here is how it turned out:
I am pretty chuffed at how it turned out for my first effort :) So of course I couldn't leave it as just the plain gradient manicure...stamping mayhem ensued and this was the end result:
The colors I chose to gradient were Ulta3 Mojito, China Glaze Custom Kicks and China Glaze Towel Boy Toy.
Here is the obligatory bottle pics!
As per the Nailasaurus tutorial I put on 2 coats of the lightest color, Mojito, after Ulta3 Base Coat. I thought this would be easy to apply but it's was difficult as it dragged and caused bald spots if I wasn't careful. It turned out nicely though and dried pretty quickly. I might put some thinner in for next use though!
Then I tried to mix the 3 colors on a piece of baking paper and swirl with a toothpick as per the tutorial. This so didn't work for me with the sponge I had. So I cut my sponge in half and dampened the sponge to stop the polish bleeding through too quickly. Here is the sponge I had. I used the middle thin edge to stamp.
I then applied Mojito, Custom Kicks and Towel Boy Toy directly to the sponge in small stripes and just dabbed onto my nail with Mojito at the cuticle and the Towel Boy Toy at the end of my nail. I dabbed up and down and side to side until I was happy. I then cleaned my cuticles and applied Seche Vite as my top coat. Here is how it turned out:
With Flash to show the creme to shimmer effect of the gradient
I am pretty chuffed at how it turned out for my first effort :) So of course I couldn't leave it as just the plain gradient manicure...stamping mayhem ensued and this was the end result:
Left Hand Stamp-o-rama using Color Club Worth the Risque
Left Thumb Stamp Right Thumb Stamp
Right hand stamping (excuse dodgy cuticles I did housework all day!)
I used a mixture of OB plates, Fun 2 plate and Bundle Monster plates. I finished off with Seche Vite top coat to seal in the stamping...and I can see from the photo of my right hand I really need to slather on the Lush Lemony Flutter Cuticle Butter. As a reformed nail/cuticle biter I am still trying to get my cuticles in much better shape!
Hope you liked my take on the gradient mani..turned out pretty well I think :)
Labels:
blue,
Bundle Monster,
China Glaze,
Fab Ur Nails,
Gradient,
Green,
OB plate,
Stamping,
Ulta3
Subscribe to:
Posts (Atom)


